Introduction

CentOS 7, a popular Linux distribution derived from Red Hat Enterprise Linux (RHEL), is widely used for servers, development environments, and learning purposes. Its stability, long-term support, and compatibility with enterprise-grade software make it a favorite among system administrators and developers. However, setting up CentOS 7 on physical hardware can be time-consuming and resource-intensive. This is where virtualization comes into play.
VMware Workstation 17 Player is a powerful virtualization tool that allows you to run multiple operating systems, including CentOS 7, on a single physical machine. Whether you’re testing software, learning Linux, or setting up a virtual lab, VMware Workstation 17 Player provides a seamless and efficient way to create and manage virtual machines (VMs). In this guide, we’ll walk you through the step-by-step process of installing CentOS 7 on VMware Workstation 17 Player.
What is VMware Workstation 17 Player?
VMware Workstation 17 Player is a free desktop virtualization application that enables users to run multiple operating systems as virtual machines (VMs) on a single physical computer. It is a lightweight version of VMware Workstation Pro, designed for personal and non-commercial use. Here are some key features of VMware Workstation 17 Player:
- Ease of Use:
- Simple and intuitive interface for creating and managing virtual machines.
- Ideal for beginners and advanced users alike.
- Cross-Platform Support:
- Supports a wide range of guest operating systems, including Linux, Windows, macOS, and more.
- Isolation and Security:
- Runs guest operating systems in an isolated environment, ensuring that your host system remains secure.
- Snapshot Functionality:
- Allows you to save the state of a virtual machine at any point in time, making it easy to revert to a previous state if something goes wrong.
- Hardware Compatibility:
- Supports USB devices, printers, and other peripherals, allowing seamless integration between the host and guest systems.
- Performance Optimization:
- Optimized for modern hardware, ensuring smooth performance even with resource-intensive applications.
Why Use VMware Workstation 17 Player for CentOS 7?
Installing CentOS 7 on VMware Workstation 17 Player offers several advantages:
- Cost-Effective: VMware Workstation 17 Player is free for personal use, making it an affordable option for individuals and students.
- Flexibility: You can easily create, clone, and delete virtual machines without affecting your host system.
- Learning and Testing: Perfect for experimenting with CentOS 7, testing configurations, or setting up a virtual lab.
- Portability: Virtual machines can be exported and run on other systems with VMware Workstation Player or Pro.
What You’ll Need
Before we dive into the installation process, ensure you have the following:
- VMware Workstation 17 Player: Downloaded and installed on your host machine.
- CentOS 7 ISO File: Downloaded from the official CentOS website or a trusted mirror.
- System Requirements:
- A computer with sufficient RAM (at least 4 GB recommended) and storage space.
- A 64-bit processor with hardware virtualization support (Intel VT-x or AMD-V).
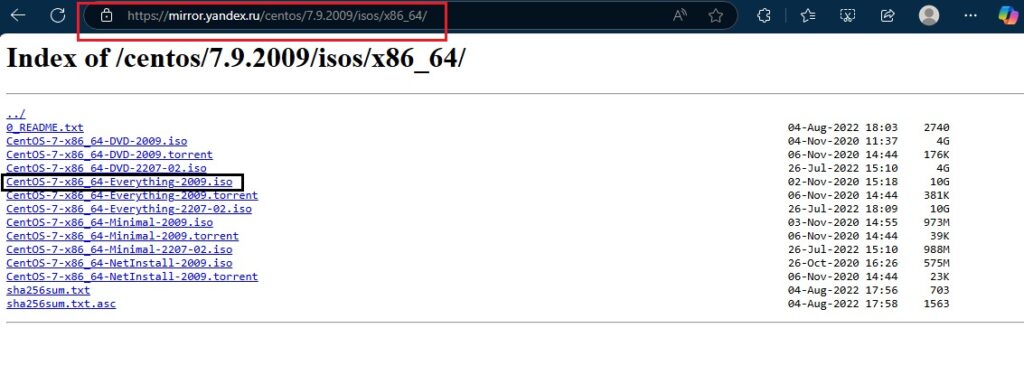
CentOS 7 is pretty old and there are many newer versions that got release later, but CentOS 7 would be the best and lightweight for learning and practicing. If I want to brush-up my skills on Linux, I head mostly to CentOS 7. Download CentOS 7 from following site. You can also download latest ISOs from CentOS official page and start running it in VMware Workstation.
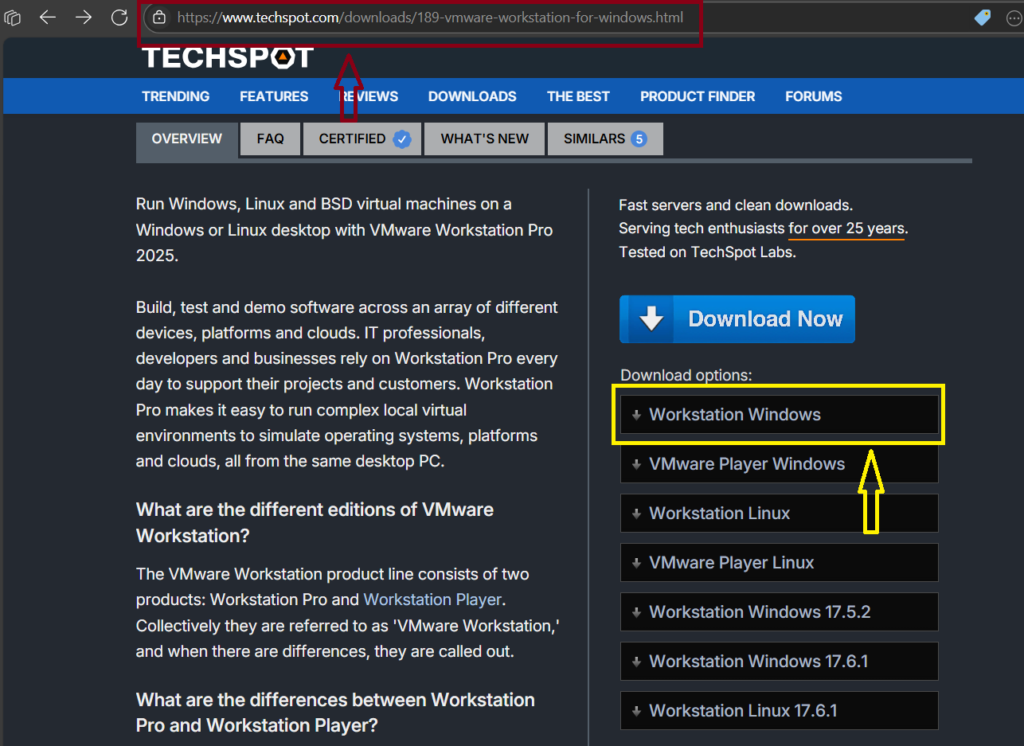
Download VMware Workstation 17 player from any trusted source or from the VMware official website
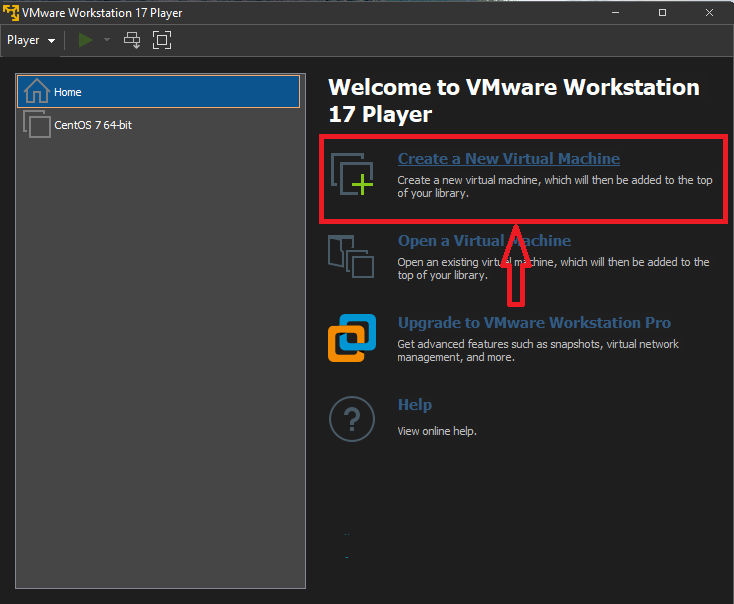
With VMware Workstation Player 17 now downloaded and installed, let’s dive into the virtual machine creation process. Upon launching the application, you’ll be greeted by a user interface similar to the screenshot below. To begin our CentOS 7 installation process, simply click on the option ‘Create a New Virtual Machine’.
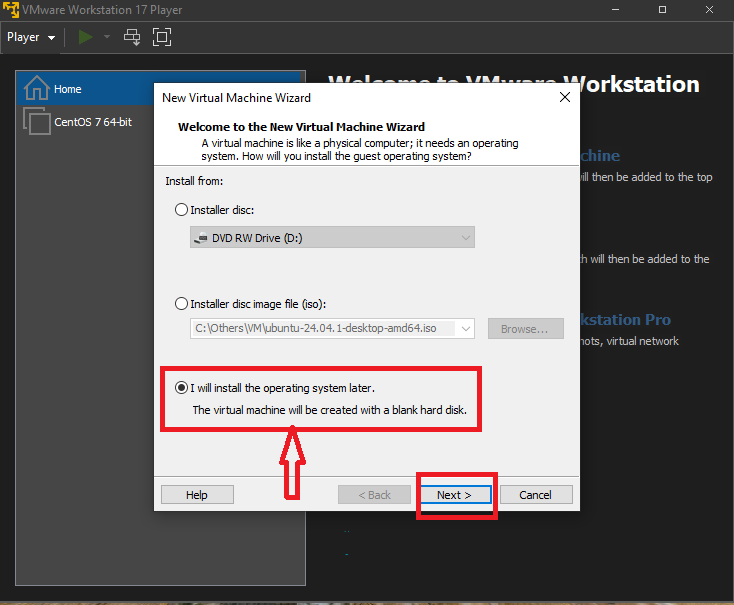
Choose the option, “I will install the operating system later.”, and then click on Next.
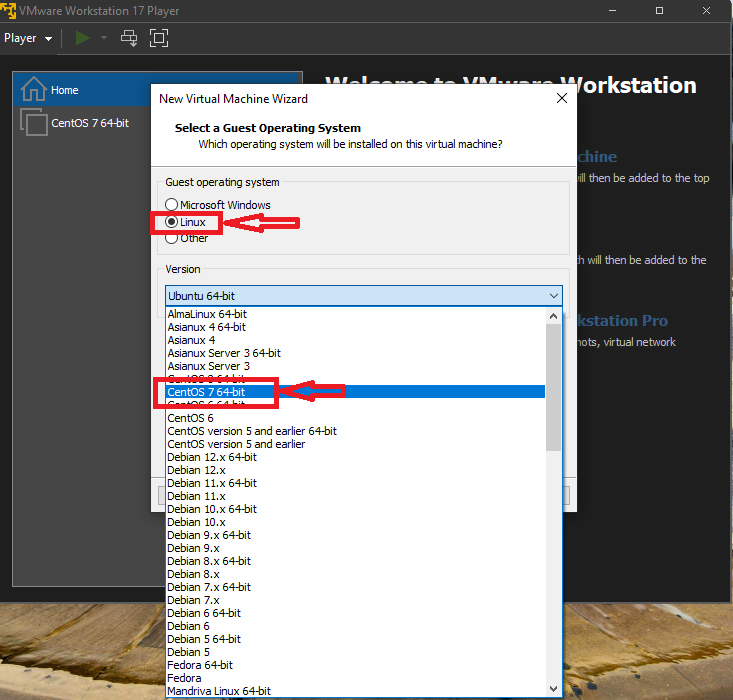
And then choose Linux, and from version dropdown select “CentOS 7 64-bit”. If you want to install CentOS 8 in VMware, then you’d be choosing “CentOS 8 64-bit ” respectively for advanced versions, and click on Next.
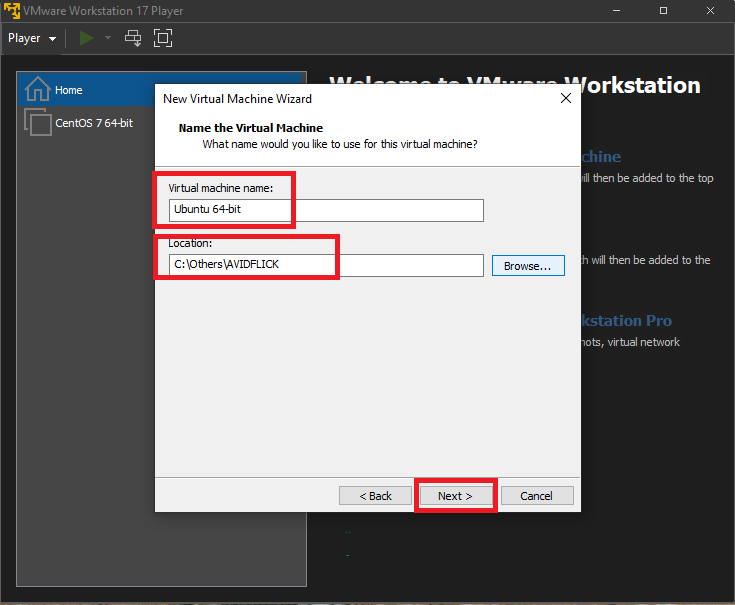
You can enter a custom name to your virtual machine and choose the location to store the virtual machine files that VMware creates and utilizes to run the CentOS inside Virtual Machine, and click on Next.
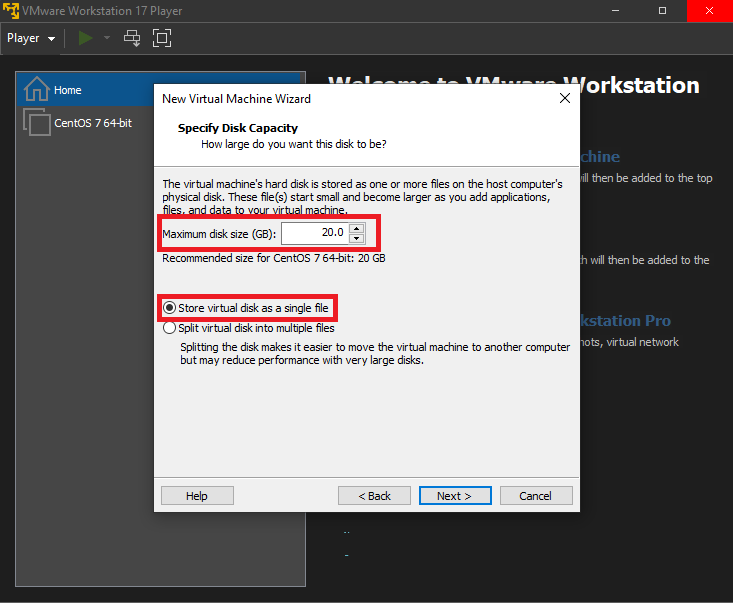
You can increase the Maximum disk size to a desired value depending on the storage of your personal computer, I’m going to leave it as it is, and then choose the option “Store virtual disk as a single file” and click on Next.
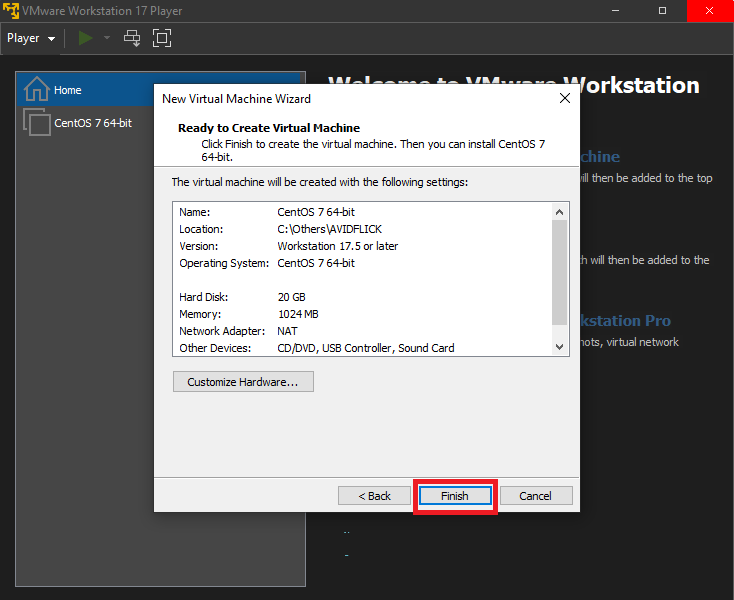
You will get a summary of all the settings that you have chosen, now click on Finish.
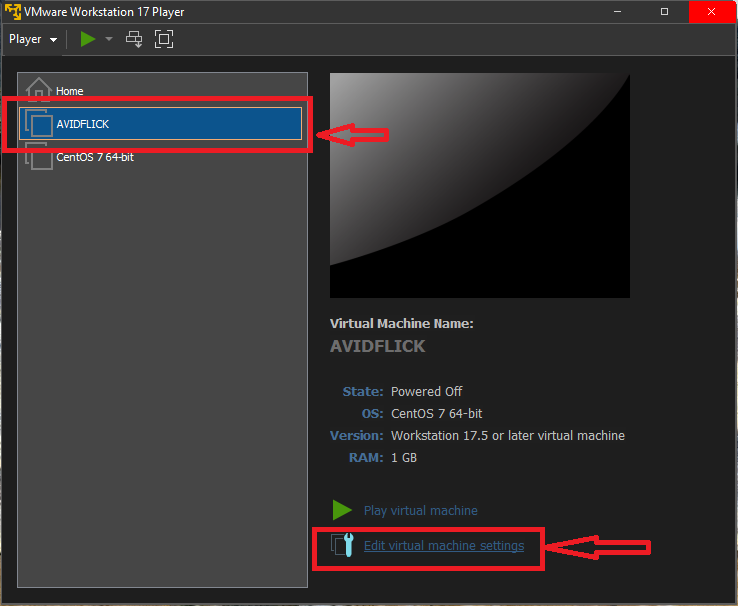
Select the Virtual Machine that you have created, in my case, I have given my virtual machine as AVIDFLICK, so, I’m going to select it and then click on “Edit virtual machine settings”.
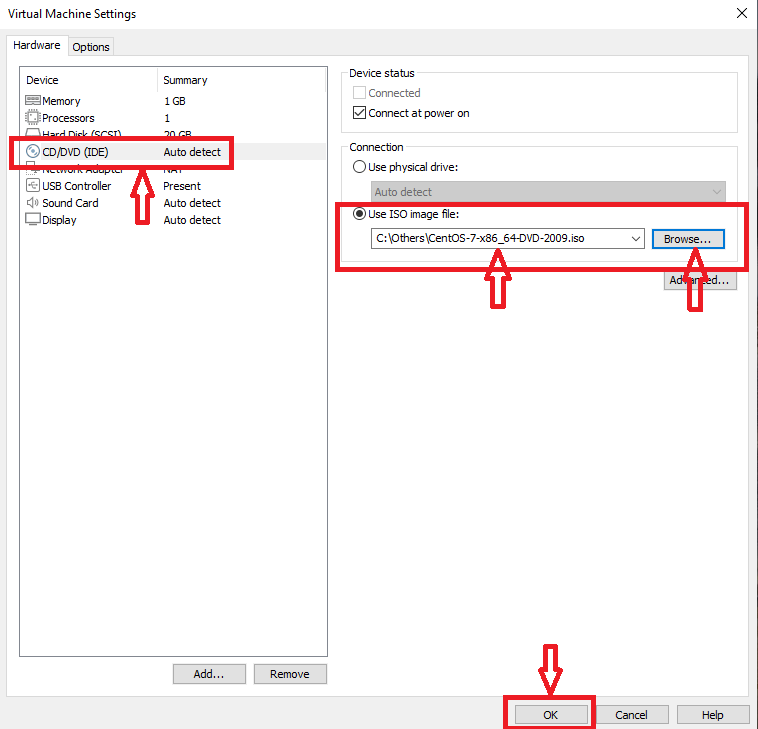
Select CD/DVD and the choose the option “Use ISO image file:”, browse and select the CentOS 7 ISO image that you have downloaded at the start. This step is kind of, we are letting the VMware software to know where the ISO image is present and to utilize it to install and run CentOS 7 OS inside VM. You can launch multiple CentOS VMs referring to the same CentOS 7 ISO image, and click on OK.
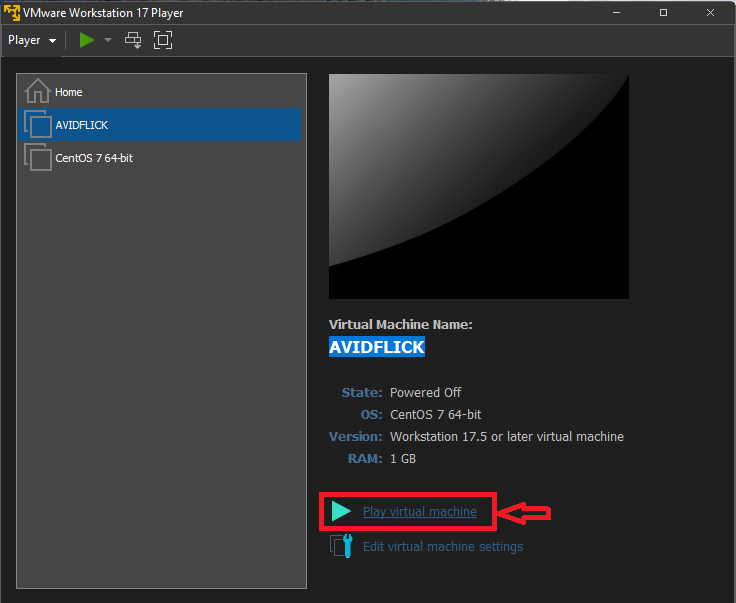
Now, click on “Play virtual machine”. Clicking this option would boot the CentOS 7 in a virtual machine.
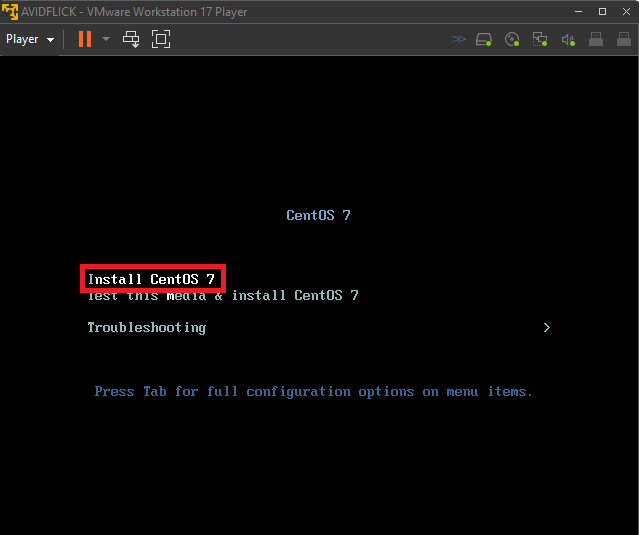
You will see the boot screen something like below. When you click your mouse inside the VM, your mouse pointer / control gets restricted to within the VM. Using the up and down arrow keys, select the option “Install CentOS 7” and click enter. To have the mouse control back to your personal computer, you will need to select ctrl + Alt on your keyboard.
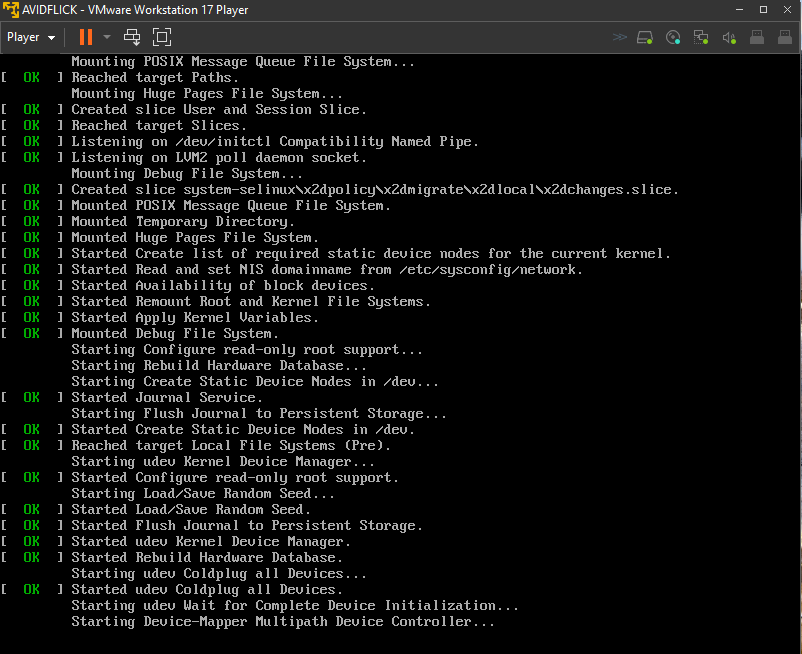
You’d see the initial booting processes running.
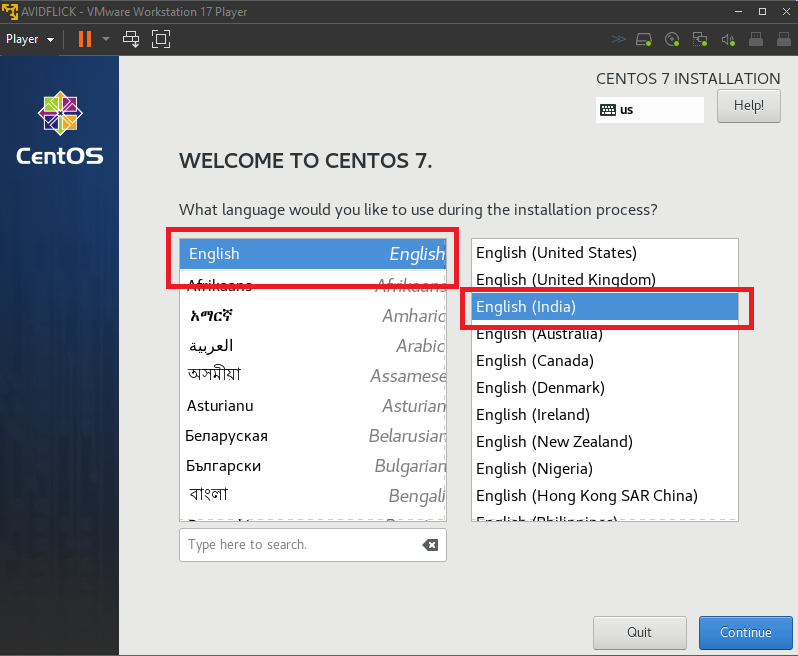
And then you’d see WELCOME TO CENTOS 7, and choose a language based on your region.
And then you will see an installation summary that contains multiple options to configure, scroll down to see more configurations.
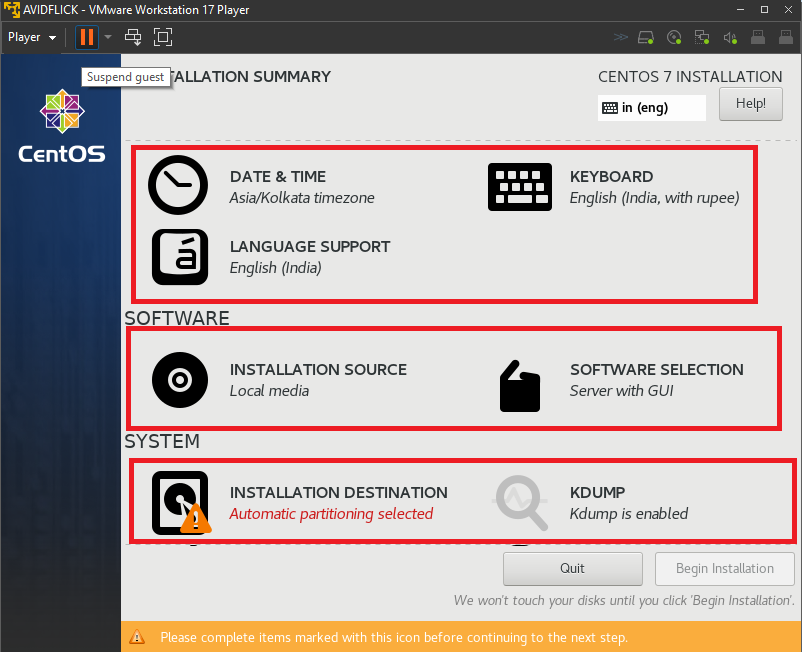
Select “SOFTWARE SELECTION”, and you’d see multiple ways of installing CentOS 7, you can choose “Minimal Install” option to install only the Command Line Interface of CentOS 7 which would be light and fast. You can also choose the option “Server with GUI” from left side and then to the right, multi-select the Add-Ons based on your requirement and then click on Done.

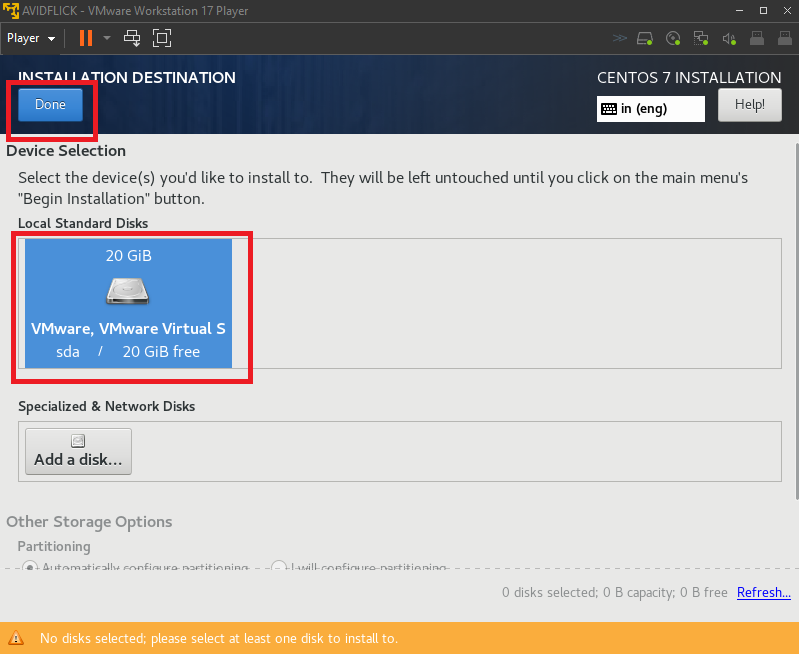
And now click on “INSTALLATION DESTINATION”, click on the 20 GB sda (you should see a black tick mark as soon as you select it), and then click Done.
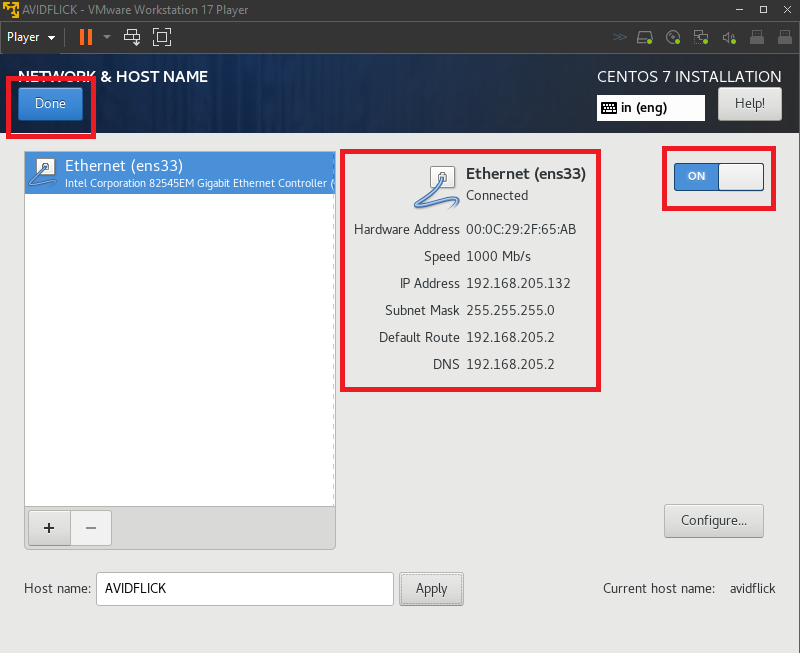
Now, select the NETWORK & HOSTNAME configuration, and toggle on the Ethernet, you should see status changing to connected and an IP address would be assigned to your virtual machine. This IP address is part of your personal computer’s IP address. Then click on Done.
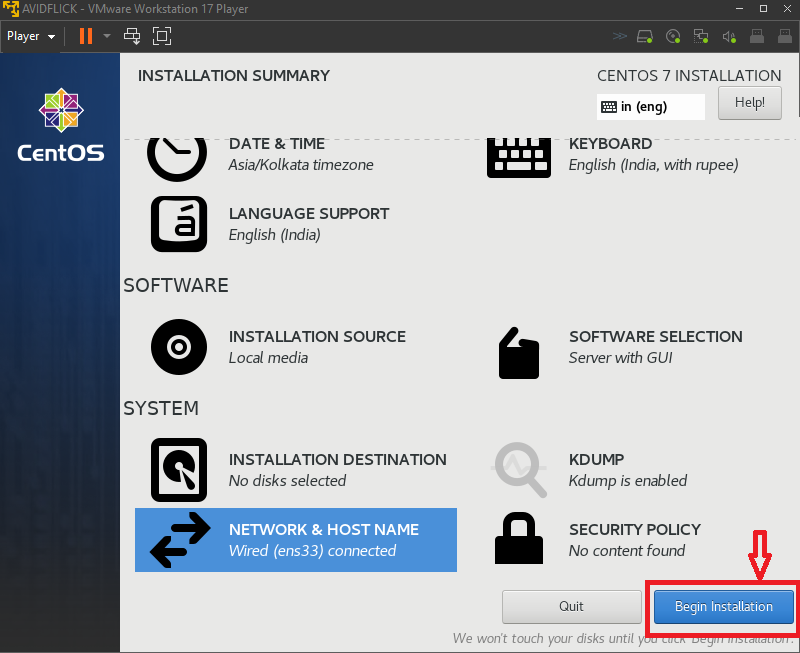
Now, click on “Begin Installation”.
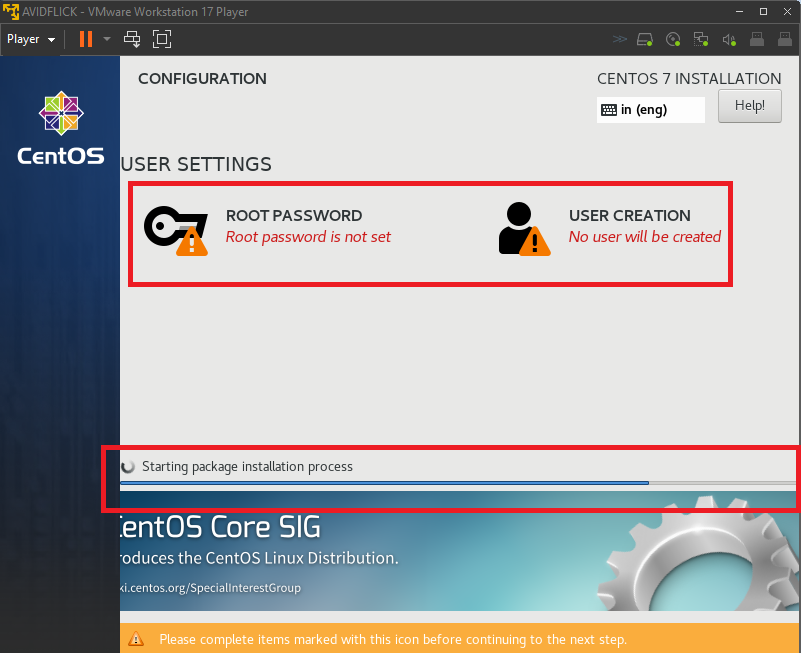
On the next screen you should see USER SETTINGS, one to set the ROOT PASSWORD and second is USER CREATION.
You will need to set the ROOT PASSWORD, logging in as a root user, you’d be able to do anything, modify any permissions or configuration files. So, you should be careful while you work under ROOT user, always make sure you are fully aware on what you are doing and always keep a habit of keeping backup before you do something.
Under USER CREATION configuration, you will need to create an user, username name can be anything of your choice, and you can also make this user as an administrator. Always it is recommended to login into the Linux system as an user, being an user, you’d have limits at some places, like editing system configuration files, changing permissions of users, installing packages etc., so, there are less chances that you’d mess your OS.
While you set the ROOT PASSWORD and create an user, CentOS 7 installation progress continues to happen in background, you should see the blue progress bar that needs to be completed.
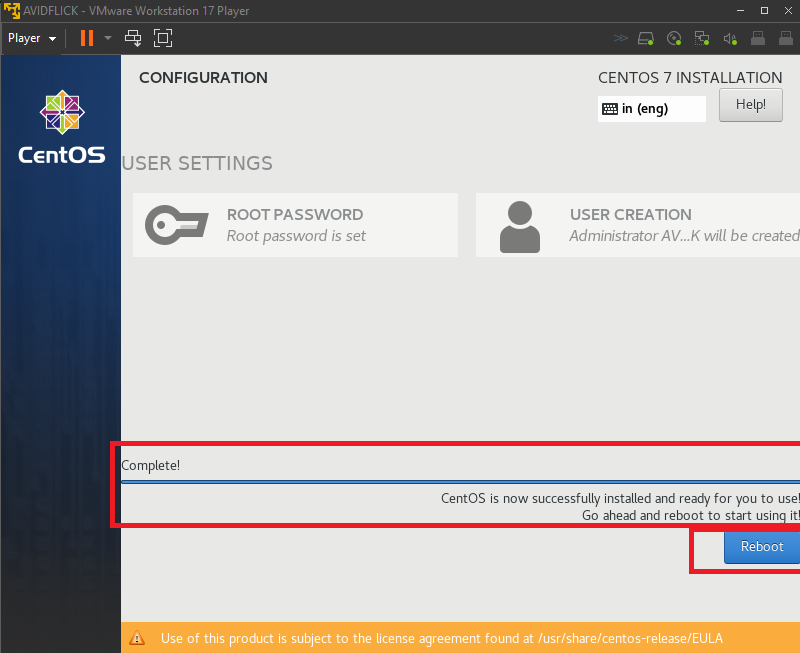
Once the progress bar completes, and you get a status Complete! Click on “Reboot”.
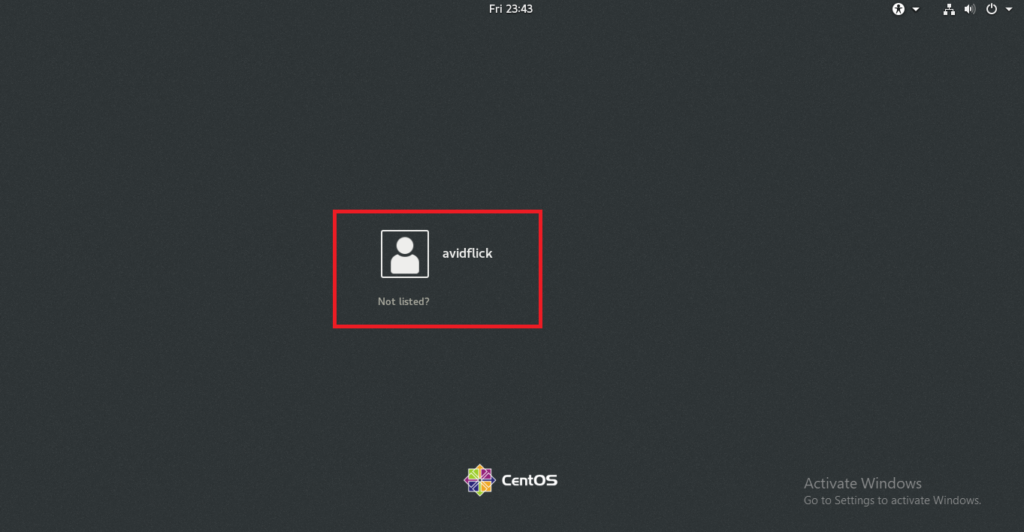
As soon as the VM reboots, you should see the login screen as below. I have chosen Server with GUI option, so, I’m able to see user login UI.
Yup, we have come to an end of installing CentOS 7 on VMware workstation player 17.
Why did I choose CentOS 7 and why not latest versions of CentOS or a different distribution (Ubuntu)?
See, my intention here is to explain Linux concepts, like Linux file system, various commands, and shell scripts etc., so, whatever OS version you pick, Linux concepts are not going to change. To have good understanding and hands-on, we can still go ahead with CentOS 7 though it is an older version. I will also try my best to learn and explain Ansible, Terraform, Terragrunt, Helm, Kubernetes (using eksctl) and many more on CentOS 7 version. I had low system resources to show the Ubuntu OS GUI installation on VMware workstation, so, CentOS 7 is lightweight and consumes low system resources and would be the right option for me to continue on the Linux concepts journey.
There wouldn’t be big differences between the CentOS 7 and Ubuntu OS, under the hood it is still the Linux and Unix. Noticeable difference would be the package manager. In CentOS you’d use yum package manager and in Ubuntu you’d use apt / apt-get.
Next Topic: WIP
Previous Topic: Linux vs Windows: Which OS is Right for You?
Leave a Reply